Development with IMA-SDK
IMA-SDK is a tool for dApp developers that emulates SKALE Node + IMA env on a single machine for dev purposes. This article will demonstrate how to setup and use the IMA-SDK in combination with IMA-JS library for dApp development.
The IMA SDK provides a locally hosted environment for developing with the SKALE IMA Bridge. Two chains are provided on different ports: on Ganache 1545, the Ethereum side IMA contracts such as DepositBoxes are deployed, and on SKALED Port 15000, the SKALE Chain side IMA contracts such as TokenManagers are deployed.
This IMA SDK works for Mac, Windows, and 64-bit Linux.
This is everything you need to develop a full dApp on SKALE with IMA Bridge and Filestorage.
What you get:
-
A SKALE Chain endpoint
-
An Ethereum Chain (Ganache) endpoint
-
Deployed IMA contracts on Ethereum (mainnet)
-
Deployed IMA contracts on SKALE Chain
-
10GB of SKALE Filestorage
Get Started with the IMA SDK
-
Ensure that the following prerequisites are installed:
-
docker
-
docker-compose (https://docs.docker.com/compose/install/)
-
nodejs (>12)
-
optional: domain name + SSL certificates if you wish to use https endpoints
-
-
Clone the IMA SDK repository
git clone https://github.com/skalenetwork/skale-ima-sdk cd skale-ima-sdk -
Copy the .env template and add your accounts:
cp .env-compose-sample .env nano .envSDK_PRIVATE_KEYis used in the background by the SDK’s IMA agent to conduct transactions on Ethereum (Ganache).TEST_PRIVATE_KEYis used by the end user to conduct general transactions. This is the only key you should use when conducting transactions. Both are automatically allocated funds by the SDK, and should be different keys. -
Export the environment variables:
export $(grep -v '^#' .env | xargs) -
(OPTIONAL) Place SSL cert & key in
sslfolder:Names must be ssl_keyandssl_cert:cp privkey.pem ~/skale-ima-sdk/ssl/ssl_key cp cert.pem ~/skale-ima-sdk/ssl/ssl_cert -
(OPTIONAL) Add additional accounts
This step is optional. Proceed to the next step if you need only 1 account with funds. You can pass any number of additional accounts to the SDK. All accounts will have pre-allocated ETH both on Mainnet and SKALE Chain sides. To do that add
additional_accounts.jsonfile in the root of the project. Structure of the file:[ { "private_key": "0x...", "address": "0x.." }, { "private_key": "0x...", "address": "0x.." } ... ] -
Startup the SDK and deploy IMA contracts to local ganache and Skaled:
WAIT=True bash scripts/run_sdk.shOutput:
Updating skaled configuration file
Will load JSON file "/Users/cskale/Projects/skale-ima-sdk/config0.json"...
Did loaded content of JSON file "/Users/cskale/Projects/skale-ima-sdk/config0.json", will parse it...
Done, loaded content of JSON file "/Users/cskale/Projects/skale-ima-sdk/config0.json".
Updated chainId: -4
Address 0x66c5a87f4a49DD75e970055A265E8dd5C3F8f852 is already in accounts section
Will save JSON file "/Users/cskale/Projects/skale-ima-sdk/config0.json"...
Done, saved content of JSON file "/Users/cskale/Projects/skale-ima-sdk/config0.json".
Done.
Creating ima_sdk         ... done
Creating ima_sdk_ganache ... done
Mainnet contracts deployed: /Users/cskale/Projects/skale-ima-sdk/scripts/../contracts_data/proxyMainnet.json
Waiting for sChain contracts 0/100
Waiting for sChain contracts 1/100
...
You can check that the
ima_sdk_ganache,ima_sdk, andima_sdk_nginxcontainers are up by executing:docker ps -a -
Wait for completion of IMA contract deployments and startup of the IMA Agent. You can check the progress as follows:
docker logs ima_sdk_ganacheYou should see this final line in the log outputs:
Listening on 0.0.0.0:1545docker logs ima_sdkAnd you should see this complete final output before using the sdk:
...
Will start SKALE Chain...
Successfully started SKALE Chain

Will deploy IMA to Main Net...
Successfully deployed IMA to Main Net...

Will deploy IMA to S-Chain...
Successfully deployed IMA to SKALE Chain...

Will register IMA...
Successfully registered IMA.

Will start IMA agent transfer loop...
Successfully started IMA agent transfer loop

Press any key to stop this docker container
You can also test the Ganache using
geth attach:geth attach http://127.0.0.1:1545Should output:
Welcome to the Geth JavaScript console!

instance: EthereumJS TestRPC/v2.11.3-beta.0/ethereum-js
coinbase: 0x98664cee8831d7a61d394d7e10207df074e5a895
at block: 0 (Mon Aug 16 2021 14:58:31 GMT-0700 (PDT))
 modules: eth:1.0 evm:1.0 net:1.0 personal:1.0 rpc:1.0 web3:1.0
And attaching to the SKALE chain:
geth attach http://127.0.0.1:15000Should output:
Welcome to the Geth JavaScript console!

instance: skaled/3.7.3+commit.ecaa2572/linux/gnu7.5.0/debug
coinbase: 0x66c5a87f4a49dd75e970055a265e8dd5c3f8f852
at block: 40 (Mon Aug 16 2021 15:01:55 GMT-0700 (PDT))
 modules: admin:1.0 debug:1.0 eth:1.0 miner:1.0 net:1.0 personal:1.0 skale:0.1 skaleDebug:1.0 skaleStats:1.0 web3:1.0
Working with the SDK
To deploy contracts and send transactions, you’ll need to know which endpoints to use and how to use skETH on your SKALE Chain. To interact with the IMA bridge predeployed contracts, you’ll also need the ABIs.
Endpoints
Use the following endpoints to deploy and transact with each chain.
# SKALE Chain
http://$IP_ADDRESS:15000
http://$DOMAIN_NAME/schain # if you have a domain name
https://$DOMAIN_NAME/schain # if you have SSL certs and domain name
# Ethereum (Ganache)
http://$IP_ADDRESS:1545
http://$DOMAIN_NAME/mainnet # if you have a domain name
https://$DOMAIN_NAME/mainnet # if you have SSL certs and domain name
How to deploy
Use the endpoints above along with your deployment scripts.
Hardhat is a popular way to deploy your smart contracts onto Ethereum, and can also be used to deploy your smart contracts onto SKALE. You can update your hardhat configuration file (hardhat.сonfig.js or hardhat.config.ts) with a configuration to deploy your smart contracts onto SKALE.
For more information on hardhat configuration files, please see Hardhat’s Configuration Documentation.
| To deploy your smart contracts onto SKALE, you need to write a script using ethers or web3. This code below shows how to setup hardhat with the private key of your wallet and endpoint to SKALE. |
/*
 * This hardhat script will deploy your smart contracts to your SKALE Chain.
 *
 *  @param {String} privateKey - Provide your wallet private key.
 *  @param {String} provider - Provide your SKALE endpoint address.
 */
import { HardhatUserConfig } from "hardhat/config";
import "@nomiclabs/hardhat-web3";
import "@nomiclabs/hardhat-ethers";

// Provide your wallet private key
let privateKey = "[YOUR_PRIVATE_KEY]";

//Provide your SKALE endpoint address
let skale = "[YOUR_SKALE_CHAIN_ENDPOINT]";

const config: HardhatUserConfig = {
  defaultNetwork: "skale",
  solidity: {
    version: '0.8.0',
    settings: {
      optimizer:{
        enabled: true,
        runs: 200
      }
    }
  },
  networks: {
    skale: {
        url: skale,
        accounts: [privateKey],
        gasPrice: 0
    }
  }
};

export default config;
You can point your deployment scripts for your existing smart contracts to your SKALE Chain’s address and deploy using existing tooling (e.g.: hardhat). An example hardhat deployment command to deploy your smart contracts using the 'skale' network in the script above is:
hardhat run upgradeToSkale.ts --network skaleTruffle is a popular way to deploy your smart contracts onto Ethereum, and can also be used to deploy your smart contracts onto SKALE. You can update your truffle configuration file (truffle-config.js) with a configuration to deploy your smart contracts onto SKALE.
For more information on truffle configuration files, please see (Truffle’s Configuration Documentation.
| To deploy your smart contracts onto SKALE, the transaction needs to be signed. This code below shows how to use the @truffle/hdwallet-provider package to sign the transaction with the private key of your wallet. |
/*
 * This truffle script will deploy your smart contracts to your SKALE Chain.
 *
 *  @param {String} privateKey - Provide your wallet private key.
 *  @param {String} provider - Provide your SKALE endpoint address.
 */

let HDWalletProvider = require("@truffle/hdwallet-provider");

//Provide your wallet private key
let privateKey = "[YOUR_PRIVATE_KEY]";

//Provide your SKALE endpoint address
let skale = "[YOUR_SKALE_CHAIN_ENDPOINT]";

module.exports = {
    networks: {
        ganache: {
            host: "127.0.0.1",
            port: 8545,
            network_id: "*"
        },
        skale: {
            provider: () => new HDWalletProvider(privateKey, skale),
            gasPrice: 0,
            network_id: "*"
        }
    }
}
You can point your deployment scripts for your existing smart contracts to your SKALE Chain’s address and deploy using existing tooling (e.g.: Truffle). An example truffle deployment command to deploy your smart contracts using the 'skale' network in the script above is:
truffle deploy --reset --network skale --compile-allNode.jsSmart contracts can be deployed with just the use of web3.js as well. Below you will find a simple script for using NodeJS and web3.
| Web3 and solc versions matter for compatibility. Web3 1.0.0-beta.35 and solc version 0.5.4 work well together, but other version combinations can cause unexpected errors. |
For more information on using web3.js, please see Web3.js Getting Started Documentation.
/*
 * This nodeJS script will deploy your smart contracts to your new S-Chain.
 *
 *  @param {String} private key - Provide your private key.
 *  @param {String} account - Provide your account address.
 *  @param {String} SKALE Chain endpoint - provide your SKALE Chain endpoint
 *  @param {String} contractName - Name of your smart contract (i.e. MySmartContract)
 *  @param {String} contractFileName - Complete filename of contract (i.e. MySmartContract.sol)
 */

const Web3 = require('web3');
const solc = require('solc');
const path = require('path');
const fs = require('fs');

let privateKey = "[YOUR_PRIVATE_KEY]";
let account = "[YOUR_ACCOUNT_ADDRESS]";
let schainEndpoint = "[YOUR_SKALE_CHAIN_ENDPOINT]";

let contractName = "HelloSKALE"; //replace with your contract name
let contractFileName = "HelloSKALE.sol"; //replace with the filename of the contract

//Retrieve and compile contract source code
const contractPath = path.resolve(__dirname, 'contracts', contractFileName);
const contractContent = fs.readFileSync(contractPath, 'UTF-8');

//Format contract for solc reader
var contracts = {
  language: 'Solidity',
  sources: {},
  settings: {
    outputSelection: {
      '*': {
        '*': [ '*' ]
      }
    }
  }
}

//add HelloSKALE contract to contract sources
contracts.sources[contractFileName] = { content: contractContent };

//compile data via solc reader
let solcOutput = JSON.parse(solc.compile(JSON.stringify(contracts)));

//get compile HelloSKALE contract
let contractCompiled = solcOutput.contracts[contractFileName][contractName];

//Connect Web3 to your SKALE Chain
const web3 = new Web3(new Web3.providers.HttpProvider(schainEndpoint));


//create transaction
var tx = {
  data : '0x' + contractCompiled.evm.bytecode.object,
  from: account,
  gasPrice: 0,
  gas: 80000000
};

//sign transaction to deploy contract
web3.eth.accounts.signTransaction(tx, privateKey).then(signed => {
  web3.eth.sendSignedTransaction(signed.rawTransaction).
    on('receipt', receipt => {
     console.log(receipt)
   }).
    catch(console.error);
});
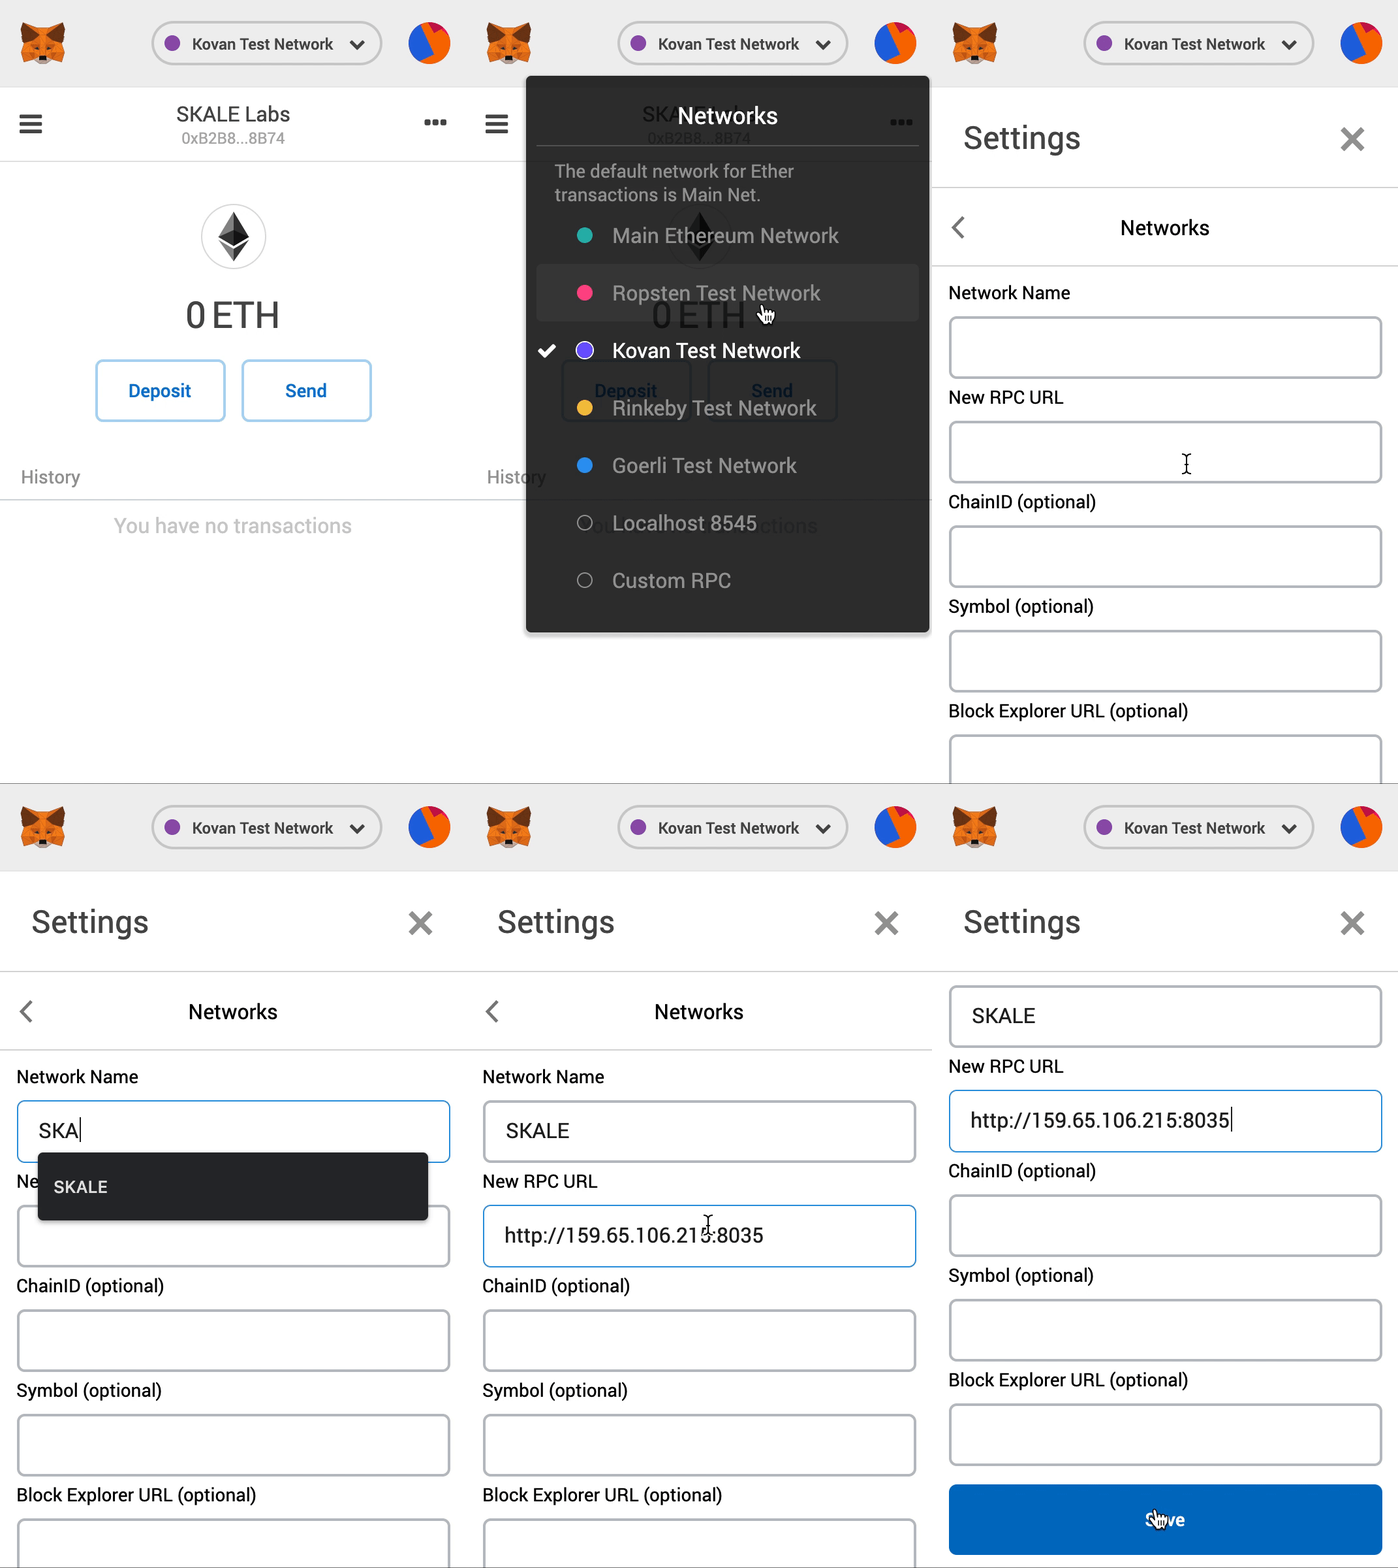
Smart contracts can be deployed using Remix and MetaMask. Follow the steps below to deploy your smart contracts.
For more information on using remix, please see Remix Documentation.
-
In Remix’s
 tab, select menu:ENVIRONMENT[Injected Web3].
 -
With MetaMask, select menu:Network[Custom RPC]
-
Enter your SKALE Chain endpoint
-
Enter your ChainID.

How to use skETH and understanding permissions/access control
The SKALE Chain owner is the only initial account allowed to deploy contracts. The owner is also the only account funded with skETH (unless you specified additional accounts in this step).
IMA-JS integration
To start development of your dApp using IMA-SDK with IMA-JS refer to this doc.
Using the IMA Bridge
Please refer to the IMA Bridge documentation here.